🔰 Introduction
In this lesson, we will build the hardware (circuit) part of our first IoT project:
🌦 IoT Based Weather Station
This project measures:
-
Temperature
-
Humidity
using a DHT11 sensor and sends the data to the ESP32.
Later, this data will be displayed on:
-
Serial Monitor
-
Blynk mobile app
🎯 What You Will Learn in This Lesson
By the end of this lesson, you will be able to:
-
Understand what the DHT11 sensor is
-
Know how the DHT11 works
-
Identify DHT11 pins
-
Connect DHT11 to ESP32
-
Build a complete circuit for the weather station
PART 1 – What is the DHT11 Sensor?
1️⃣ What is DHT11?
DHT11 is a digital temperature and humidity sensor.
It measures:
-
🌡 Temperature (in °C)
-
💧 Humidity (in %)
and sends the data in digital format to a microcontroller.
2️⃣ Why We Use DHT11 in This Course
We use DHT11 because:
-
Very cheap
-
Easy to use
-
Beginner friendly
-
Good enough for learning
-
Only needs 1 data pin
3️⃣ What Does DHT11 Measure?
| Parameter | Range | Accuracy |
|---|---|---|
| Temperature | 0°C to 50°C | ±2°C |
| Humidity | 20% to 90% | ±5% |
4️⃣ How DHT11 Works (Simple Explanation)
Inside the DHT11 sensor:
-
A humidity sensing element
-
A temperature sensing element
-
A small chip that converts analog values into digital data
The ESP32:
-
Sends a request signal
-
DHT11 replies with temperature and humidity values
-
Data is sent using 1 single data wire
PART 2 – Types of DHT11 Modules
5️⃣ Bare DHT11 vs DHT11 Module
You may see two types:
🔹 Type 1: Bare DHT11 (4 pins)
Pins:
-
VCC
-
DATA
-
NC (not connected)
-
GND
🔹 Type 2: DHT11 Module (3 pins)
Pins:
-
VCC
-
DATA
-
GND
This module already has a resistor.
👉 In this course, we use the 3-pin DHT11 module.
PART 3 – DHT11 Pin Description
6️⃣ DHT11 Pins (3-Pin Module)
| Pin Name | Function |
|---|---|
| VCC | Power supply (3.3V or 5V) |
| DATA | Sends digital data |
| GND | Ground |
PART 4 – What is a Weather Station Circuit?
7️⃣ What Our Circuit Will Do
The circuit will:
-
Power the DHT11 sensor
-
Read temperature and humidity
-
Send values to ESP32
8️⃣ Components Required
For this lesson, you need:
-
ESP32 Dev Board – 1
-
DHT11 Sensor Module – 1
-
Breadboard – 1
-
Jumper Wires (Male–Female) – 3
PART 5 – ESP32 Pin Selection
9️⃣ Which ESP32 Pins We Will Use
| Purpose | ESP32 Pin |
|---|---|
| DHT11 VCC | 3.3V |
| DHT11 GND | GND |
| DHT11 DATA | GPIO 4 |
👉 You can use other GPIO pins, but we standardize GPIO 4.
PART 6 – Step-by-Step Circuit Connections
🔧 Step 1: Place ESP32 on Breadboard
-
Insert ESP32 into breadboard
-
Make sure pins are accessible
🔧 Step 2: Connect Power to DHT11
-
DHT11 VCC → ESP32 3.3V
-
DHT11 GND → ESP32 GND
🔧 Step 3: Connect Data Pin
-
DHT11 DATA → ESP32 GPIO 4
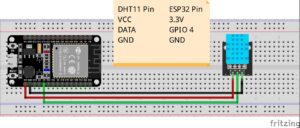
✅ Final Connection Table
| DHT11 Pin | ESP32 Pin |
|---|---|
| VCC | 3.3V |
| DATA | GPIO 4 |
| GND | GND |
PART 7 – Circuit Diagram (Text Description)
1️⃣0️⃣ Logical Circuit View
PART 8 – Important Electrical Notes
⚠️ Power Voltage
-
DHT11 works at:
-
3.3V (recommended for ESP32)
-
5V (also supported)
-
👉 Use 3.3V to be safe.
⚠️ Pull-up Resistor
-
DHT11 needs a pull-up resistor on DATA line
-
The module version already has it built-in
👉 No external resistor needed.
PART 9 – Common Beginner Mistakes & Fixes
❌ Mistake 1: Sensor Not Working
Cause:
-
Wrong wiring
-
VCC and GND reversed
Fix:
-
Recheck pin labels
-
Match with connection table
❌ Mistake 2: Always Shows 0 or NaN
Cause:
-
Wrong DATA pin number in code
-
Loose wire
Fix:
-
Use same GPIO number in code
-
Press wires firmly
❌ Mistake 3: ESP32 Resets Randomly
Cause:
-
Power short circuit
-
Loose connection
Fix:
-
Check for wire touching
-
Use correct 3.3V pin
PART 10 – What’s Next?
In the next lesson:
Lesson 1.2 – Code & Logic (DHT11 Weather Station)
You will learn:
-
How to install DHT11 library
-
How to read temperature & humidity
-
How to print values on Serial Monitor
-
How to send data to Blynk